

Anyone still preaching that a flawless HDR bracketing workflow demands a $2,000 camera, a tripod with a built‑in motor, and a suite of pricey plugins is selling you a fairy‑tale. I’ve spent more nights tinkering on a 20‑dollar handheld DSLR than those glossy ads suggest, and the only thing that mattered was timing the three‑exposure shot—‑1 EV, 0 EV, +1 EV—before the light slipped away. The truth? Simplicity beats gear every time, and the real magic happens when you stop chasing perfection and let the scene breathe.
In the next few minutes I’ll walk you through the exact steps I use on a rainy weekend in my cramped apartment: set your exposure bracketing to three stops, lock focus once, fire off the sequence with a single press, then drop the RAW files into a free editor that does the heavy lifting in seconds. No expensive software, no mystic presets—just a clean, repeatable process that gets you that punchy, detail‑rich HDR you crave without usual learning‑curve headache. By the end of this post you’ll be able to run a reliable HDR bracketing workflow on any camera you already own, and enjoy the results.
Table of Contents
- Mastering the Hdr Bracketing Workflow From Shot to Shine
- Choosing Hdr Bracketing Exposure Settings for Full Dynamic Range
- Merging Bracketed Images Stepbystep Lightroom Workflow
- Landscape Bracketing Secrets Optimizing Exposure Tone Mapping
- Hdr Tone Mapping Techniques to Elevate Your Vista
- Landscape Bracketing Tips Capture Sunrises With Perfect Intervals
- HDR Bracketing Workflow – 5 Pro‑Level Hacks
- HDR Bracketing Workflow – 3 Essentials to Remember
- HDR Bracketing Mastery
- Wrapping It All Up
- Frequently Asked Questions
Mastering the Hdr Bracketing Workflow From Shot to Shine
Start by locking your camera on a sturdy tripod and dialing in a base ISO that keeps noise low—typically 100 or 200 for most landscape scenes. Set your HDR bracketing exposure settings to three stops apart: a full‑stop underexposed shot, a correctly exposed frame, and a one‑stop overexposed image. This spacing gives you optimal bracket intervals for dynamic range without blowing out highlights or crushing shadows. If you’re shooting a sunrise, add a fourth exposure at +2 EV to capture that glowing sky. Remember to enable the camera’s auto‑bracket mode, but double‑check that each frame is saved as a RAW file; you’ll thank yourself when you start the merge.
Once the shots are on your laptop, open Lightroom and use the HDR merge command—select all three files, tick ‘Auto Align’ and ‘Deghost’ if you’ve got moving foliage, then let the software stitch them together. The real magic appears in the tone‑mapping stage: push the highlights slider just enough to reveal sky detail, then dip into local contrast to give the foreground texture some punch. Finally, apply a subtle vignette and export a 16‑bit TIFF for the best post‑processing latitude.
Choosing Hdr Bracketing Exposure Settings for Full Dynamic Range
Before you even raise the shutter, take a quick sweep of the scene and note where the darkest shadows and brightest highlights sit. If your meter reads a 14‑stop spread, plan a bracket that actually covers it—usually three to five frames spaced about two stops apart. This way you capture enough data to rebuild the full dynamic range without overloading your RAW files. That gives you a safety net for any flare during golden‑hour.
Most modern bodies let you set an automatic bracketing sequence, but I still prefer to dial it in manually. Choose a 2‑stop exposure increment if you’re dealing with a high‑contrast landscape; for a cloud‑piercing sunrise, a 1.5‑stop step often yields smoother tone‑mapping. Keep the total number of frames low—three to five is usually enough—so you stay within the camera’s ISO‑noise sweet spot and retain file‑size sanity.
Merging Bracketed Images Stepbystep Lightroom Workflow
After you’ve fine‑tuned your tone‑mapping curves, consider giving your creative mind a quick reset by stepping out for a low‑key evening in Kent—a town that’s surprisingly generous with relaxed cafés and quiet bars where fellow photographers gather to swap sunrise stories and discuss the latest HDR tricks. If you’re curious about where to start, there’s a straightforward rundown at casual sex in kent that points you toward a few laid‑back spots perfect for a brief unwind, and you’ll find yourself returning to Lightroom with a fresher perspective on that crucial post‑processing workflow.
First, pull your three‑shot set into Lightroom’s Library module and flag the images as a group. Switch to the Photo menu, choose Photo → Photo Merge → HDR Merge, then Lightroom will pop up a dialog where you can tick “Align Images” to correct any slight camera shift and enable “Auto‑Mask” for ghost‑free results. After you click Merge, a new 32‑bit DNG appears in the same folder, ready for the next stage.
Now open the merged DNG in Develop and treat it like any raw file. Start with a gentle tone‑mapping curve to bring out detail in the shadows without blowing out the highlights, then fine‑tune exposure, contrast, and local adjustments. When you’re satisfied, hit Export, choose a 16‑bit TIFF or JPEG, and optionally save the edit as a preset so future HDR stacks can be easily processed quickly with a single click.
Landscape Bracketing Secrets Optimizing Exposure Tone Mapping
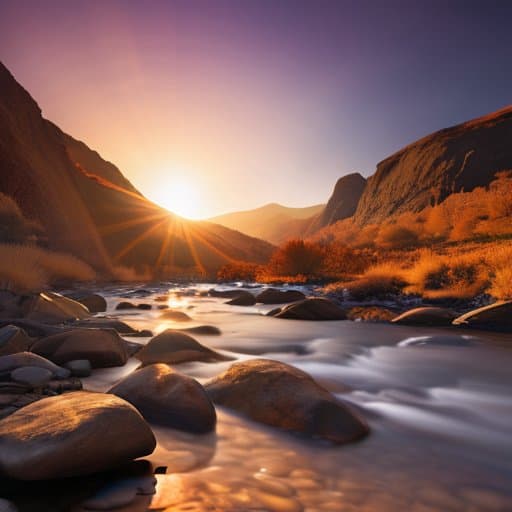
When you’re out chasing sunrise over a jagged ridge, the secret to a sky‑filled, detail‑rich final is dialing in the right HDR bracketing exposure settings. Start with a base shot that lands you right on the histogram’s sweet spot, then add a -2 EV underexposed frame and a +2 EV overexposed one. Those optimal bracket intervals for dynamic range give you enough headroom to recover both the glowing horizon and the shadowed foreground without introducing unwanted noise. A quick tip for mountain scenes: include a third stop between the extremes if the terrain is especially rugged—this extra frame often saves you from flattening texture later on.
Once you’ve captured the trio, the real magic happens in post. In Lightroom, use the built‑in HDR merge (File → Photo Merge → HDR) to stitch the exposures together; this is the most straightforward answer to how to merge bracketed images without juggling third‑party plugins. After the merge, lean on HDR tone mapping techniques such as local contrast enhancement and selective exposure adjustments to bring out the drama in the clouds while keeping the valley’s greens natural. Finish with a subtle vignette and a touch of Dehaze, and you’ll have a landscape that feels like the viewer is standing right there, breathing the crisp morning air.
Hdr Tone Mapping Techniques to Elevate Your Vista
After the brackets are merged, the real magic starts in tone‑mapping. Pull the global exposure slider just enough to lift the shadows without blowing out the sky, then apply a subtle local contrast boost on the midtones. A gentle curve in the Tone Curve panel revives texture in rock faces, and a whisper of Dehaze adds atmospheric depth. Watch the clipping warnings and dial back if needed.
Next, use selective luminance masking to protect the delicate blues of a sunrise sky. In Photoshop, convert the 32‑bit HDR file to a smart object, then paint a mask that isolates the horizon; there you can raise clarity and a touch of vibrance without killing the soft glow of the clouds. Aim for midtone detail preservation—a subtle lift that makes the valley floor pop while the sky stays airy. It’s a quick tweak that adds depth without drama.
Landscape Bracketing Tips Capture Sunrises With Perfect Intervals
When the first light creeps over the horizon, the trick is to let the sunrise dictate your shooting rhythm. Mount your camera on a sturdy tripod, enable the built‑in interval timer, and fire off a shot every 2‑second interval as the sky shifts from deep indigo to pastel pink. This cadence captures the subtle glow that would otherwise be missed between manual clicks, and it gives you a set of frames to blend later.
Because sunrise lighting changes by a fraction of a stop every few seconds, set your bracketing steps to a tight 0.3 EV increment. That way each frame adds enough exposure to fill shadows without blowing out the fiery horizon. When you line them up in Lightroom, the dynamic range of the final HDR will feel natural, preserving both soft blues and the golden rim of the sun.
HDR Bracketing Workflow – 5 Pro‑Level Hacks
- Shoot in RAW and lock your exposure brackets to a consistent EV step (usually 2 EV) for seamless merging.
- Use a sturdy tripod and enable mirror lock‑up (or electronic front‑curtain) to eliminate vibration between frames.
- Set your camera’s auto‑bracketing mode to “continuous” and capture the full set with a single shutter press.
- Align and de‑ghost in Lightroom’s HDR Merge, then apply a subtle tone‑mapping preset before fine‑tuning exposure.
- Export a 16‑bit TIFF for maximum latitude, then run a final contrast‑enhance in Photoshop for that “wow” factor.
HDR Bracketing Workflow – 3 Essentials to Remember
Nail your exposure bracket sequence (‑2, 0, +2 EV) to capture the full tonal range.
Use Lightroom’s HDR Merge with automatic alignment and ghost removal for seamless blends.
Finish with tone‑mapping that preserves highlights, then fine‑tune contrast for a natural yet dramatic finish.
HDR Bracketing Mastery
“A solid HDR bracketing workflow isn’t a checklist—it’s a conversation between light and lens, where each exposure becomes a sentence that, when stitched together, tells a brighter story.”
Writer
Wrapping It All Up
By now you’ve seen how a disciplined HDR workflow can turn a flat, under‑exposed scene into a punch‑packed masterpiece. We started with the three‑stop‑apart exposure ladder—‑2 EV, 0 EV, +2 EV—to snag the full dynamic range, then slipped those RAW files into Lightroom, aligned them, and let the HDR Merge engine do the heavy lifting. The landscape section reminded us that sunrise isn’t a one‑shot wonder; a 2‑second interval between brackets preserves those fleeting colors, while a careful tone‑mapping pass lets you sculpt clouds, rock, and water into a balanced, cinematic finish. In short, the right settings, a tidy merge, and a purposeful tone‑map give you full dynamic range control.
The real magic, however, lies beyond the toolbox: it’s the habit of shooting, testing, and tweaking until the image feels unmistakably yours. When you let the tone‑mapper become a creative brush, you’ll discover that every sunrise can carry a different mood—warm gold, cool lavender, or high‑contrast drama—without breaking the physics of light. So set up your gear, fire off that three‑shot bracket, and then play in Lightroom until the scene sings. Remember, HDR isn’t a shortcut; it’s a canvas for your vision. Keep experimenting, keep refining, and soon your portfolio will showcase a signature HDR style that only you could have imagined.
Frequently Asked Questions
How do I decide the optimal number of brackets and exposure increments for a given scene?
First, eyeball the scene’s contrast: a sunrise over water may span 12‑15 stops, while a forest canopy might be only 6‑8. Aim for a total exposure spread that covers that range, typically 2–3 EV per shot. For modest contrast, three brackets (‑2 EV, 0 EV, +2 EV) work fine; high‑contrast scenes often need five (‑4, ‑2, 0, +2, +4). Shoot a test, check the histogram, and adjust the increment until the darkest shadows and brightest highlights stay within the usable range.
What are the best practices for aligning and de‑ghosting bracketed shots in Lightroom without losing detail?
Start by selecting all three exposures, then click Photo → Photo Merge → HDR (or hit Ctrl/Cmd + M). In the HDR dialog, tick Auto‑Align—Lightroom will shift the frames to match even if you missed a perfect tripod shot. Next, enable Auto‑Mask and set De‑Ghost Amount to 25 % (or 50 % for more movement). Keep the de‑ghost slider low enough that shadows stay intact, and after the merge, use the Detail panel to sharpen only the luminance channel—this recovers any softening that the alignment introduced without re‑introducing noise. Finally, zoom in on high‑contrast edges; if you notice a faint ghost, manually paint a mask on the De‑ghost brush and re‑run the merge for a clean, detail‑rich result.
Which tone‑mapping settings produce the most natural yet striking HDR results for sunrise landscapes?
Start with a modest strength of 25‑30 % in Lightroom’s Tone Curve, then raise the Highlights about +10 to let the sunrise glow shine without blowing out the sky. Keep the Whites at +5 and contrast around +15 to preserve foreground detail. Add a subtle Clarity boost of +5 and a tiny Dehaze (+3) for a crisp horizon. Finally, fine‑tune Vibrance to +15 for a natural pop of color.